Van Conversion Electrical Systems | Everything You Need to Know!
last updated: Dec 12, 2023
After years of working helping people convert their vans, I know for a fact that the electrical system is the area that people find most intimidating. But don’t worry, we are here to help!
The aim of this article is to try and reduce this intimidation factor by giving you an overview of a camper van’s electrical system – helping you understand the main things need to think about when designing one.
The electrical system in a campervan plays a big part in the comfort of the van. Lighting, cold beers, heating the van, and movie nights all depend on a reliable, safe system that works anytime, anywhere. A well-functioning setup – designed to meet your needs – is fundamental to turning a lump of metal on four wheelps into a cozy home.
Electrical systems in camper vans and motorhomes tend to go unnoticed, that is until they no longer work or when something goes wrong. If you can get this crucial stage of your build right it is going to save you many headaches further down the line.
Whether you are preparing to install a complete DIY campervan electrical system from scratch, upgrading an existing setup, or want to figure out if the electrics in a second-hand campervan suits your needs, this article is for you.
Don’t forget! We offer an Electrical Design Service, a done-for-you system design and specification that will help you avoid making big mistakes and make sure that the system you install is safe and everything works correctly together!
Sizing your Batteries for your Campervans Electrical System
To start with, we need to look at batteries. They are at the heart of the electrical system and are critical to its performance.
In order to size your batteries (usually measured in AmpHours) we need to calculate the load. By ‘calculate the load’ we mean to look at all the components and appliances that you will be powering using the batteries.
The more components and appliances = the higher the load, and the higher the load, the bigger the battery bank needs to be.
You need to think about appliances such as fridges, fans, pumps, heaters, hot water appliances, device chargers, and lighting. These are the most common appliances used in a campervan’s electrical system. The power these appliances use depends on the manufacturer and model, so be sure to pick an appliance you are happy with before working out it’s power usage.
Try not to generalise when it comes to calculating your appliance’s power usage, the more accurate you can be, the better! Where we can generalise is the time in which the appliance is used for, more on that below.
In order to size your system you will need to understand the equation below, this will help you find your total load.
Maximum power of your appliance (watts) divided by the voltage of your system = Current (Amps)
Current (Amps) multiplied by how many hours of usage per day = Amp Hours per Day (Ah/day)
For example:
You have an 80W Fan:
80 Watts / 12 Volts = 6.66 Amps
6.66 Amps X 2 Hours = 13.3AmpHours/day
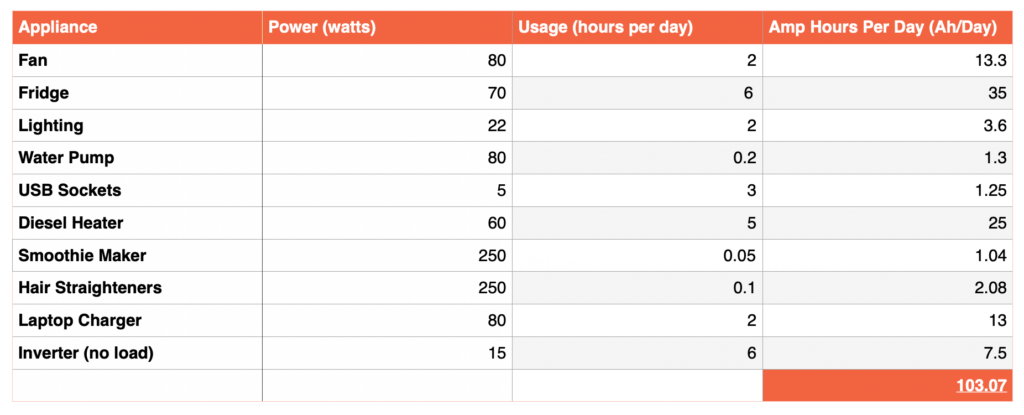
Remember, when thinking about how long appliances and accessories will be used for, items like fridges intermittently cut in and out. Take this into consideration. We have allowed 6 hours per day for the fridge, but this depends on the fridge’s size, the settings (how cold you make it) and the ambient temperature of your campervan.
From the table above we can now see that our total daily usage will be around 103AmpHours/day. Keep in mind, this is somewhat exaggerated, because in summer your heater won’t be running and in the winter your fridge won’t be on for as long.
Once the load has been calculated you now roughly know what size battery you require.
We say ‘roughly’ because there are other factors at play when sizing your batteries. How you plan on recharging your batteries is very important. A larger charging source or more time spent on shore power means your battery bank doesn’t need to be as large, limited charging sources or more time off the grid means you need to allow for more of, if not the full amount, of ‘ah’ between each charge period.
Can I use the engine battery as a leisure battery?
Starter batteries are the type of batteries that are used in cars, boats, lorries, buses to turn the engine over and to start the vehicle. These starter batteries however are not suitable for use cases where they are discharged and then recharged again – something we call cyclical use.
Also, starter batteries should not be used in connection with an inverter. Although they technically can be, the battery’s make-up is not designed to feed an inverter.
The reason that start batteries are not suitable for frequent deep discharging is because of the way they have been constructed. They have thin plates with a large surface area. They are designed purely for short-term high-discharge currents like starting an engine. This is the opposite of what you need to power the appliances in your van conversion, which is a little power for a long time.
It might be tempting to use starter batteries in a battery bank in smaller inverter systems, but please don’t do it. It will only cause trouble in the long run.
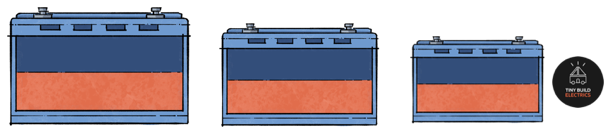
What type of battery is best for a van conversion?
The type of battery you choose will depend upon a few things.
- Your Budget – how much you are willing to spend on your batteries.
- Travel Style – do you plan to be fully off-grid, partially off-grid, use campsites or maybe a mixture of them all?
If you have access to shore power (hook-up to mains) charging on a regular basis – at campsites for example – then how long your battery bank needs to operate off-grid is not too much of an issue. However, if you plan to be fully off-grid, your batteries need to be able to sustain your load as well as be charged and discharged on a regular basis by your engine and/or solar array.

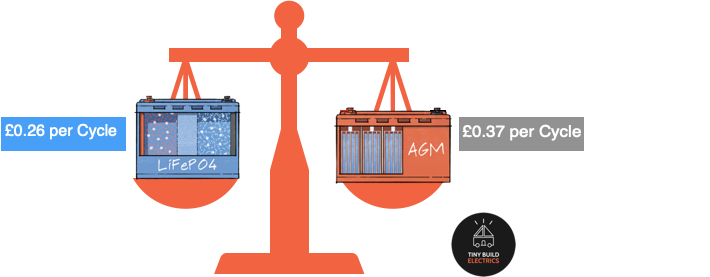
Price comparison

The table above clearly shows us that whilst the lithium-ion battery is more expensive than an AGM battery, it works out to be cheaper when you consider the cost per cycle over its lifetime. The life cycle of the lithium-ion battery is unmatched and is something to consider if you want a ‘fit and forget’ electrical system in your camper van.
Flood lead acid battery (FLA)
Flood lead acid batteries consist of two lead plates, one positively charged, the other negative. The battery is then flooded with a liquid electrolyte, sulphuric acid which covers all internal parts. When charging commences the acid and lead plates react to store electricity.
Pros of Lead Acid batteries
- Low cost
- Resilient to occasional overcharging
- Proven technology
- Lifespan can be 4-8 years with regular maintenance and careful charging
- Less susceptible to temperature differences
Cons of FLA batteries
- As the batteries age the performance will degrade to the point where the battery won’t hold a charge
- Battery can only be drained to a maximum depth-of-discharge of 50%, otherwise will incur damage.
- Must be vented in an enclosed area as some FLA batteries will emit gases.
- Stricter regulations on how FLA batteries are fitted and how close they are installed to inverters and chargers.
- Require regular maintenance
- Heavy
GEL batteries
Gel batteries use the same technology as FLA but instead of liquid acid they use Gel. Gel gives us more advantages than FLA as you’ll see below.
Pros of Gel batteries
- Doesn’t emit any nasty gases
- Sealed so can’t leak or produce any gas
- Maintenance free
- Operates in a wider array of temperatures than AGMS.
- Ideal for vans that are stored over winter and not used for long periods of time
Cons of Gel Batteries
- Very sensitive to depth of discharge
- Do not recover well from a low depth-of-discharge
- More expensive than conventional FLA and AGM
- Heavy
Absorbed glass mat (AGM) battery
AGM’s again, work in a similar manner to FLA and Gel. Instead of acid or gel they have electrolyte soaked glass fibres between the positive and negative plates.
Pros of AGM batteries
- Long shelf life
- Maintenance free
- Ideal for vans that are stored over winter and not used for long periods of time
- Can be installed sideways as its a sealed unit and cannot leak (unless damaged)
- Smaller than the conventional Gel equivalent
Cons of AGM batteries
- Very sensitive to depth of discharge
- Do not recover well from a low depth-of-discharge
- More expensive than FLA
- Heavy
- Poor performance in colder temperatures
Lithium LiFePO4 / Lithium-ion / Li-ion batteries
The famous lithium-ion battery. If you have done any research on van conversion electrical systems or other off-grid systems then it is likely you have come across lithium batteries. Currently at the top end of the battery technology market, this is a battery you should be seriously considering for your build. There is however just one downside… the price!
Pros of Lithium Batteries
- 30% lighter and smaller than FLA, GEL & AGM
- You can use up to 90% of their capacity meaning you need less batteries for the same output
- Low internal impedance (resistance) means these batteries also charge a lot quicker than the other types of batteries.
- Can be installed in various orientations
- Maintenance Free
- Long life cycles if charged and discharged in accordance with manufactures instructions
Cons of Lithium Batteries
- Very sensitive to charging in low temperatures
- Expensive, although prices have started to drop over the past few years
- A battery management system is required to protect the lithium-ion battery bank from excessive discharging, over overcharging and to control the load and balancing of each internal cell. Most of the time this system is built into the battery itself.
- Some extra monitoring may be required such as battery temperature monitoring
Honestly, if you want my personal opinion I would look at it like this: if you plan to use your van for more than three years, and you can afford it, buy Lithium batteries. If you do not plan to use your van for very long, or very often, AND you want to keep it as cheap as possible – get AGM batteries.
Important Notes for Van Conversion Batteries
There are several considerations when choosing your battery.
If you plan on going for a flood lead acid battery just be aware that these batteries need ventilation and you need to monitor them to ensure they are not leaking. Therefore they cannot be buried deep in your van conversion, bear this in mind at the design stage.
There are also stricter regulations around how close flood lead acid batteries can be fitted to items such as inverters and other power supplies, so you will need to ensure there is an abundance of space to fit this type. I would recommend simply avoiding the use of FLA batteries, they are a nuisence for both the build and ongoing maintenance.
If you want a fit and forget system, with efficiency, and a long cycle life then Lithium-ion is going to be the best choice. Yes, the lithium batteries are more expensive, but, they are slowly coming down in price due to an improved manufacturing process. Considering how long lead-acid or AGM batteries last (in my experience about 3 years of full-tiime use) the economics are now clearly in favour of using Lithium-ion batteries. That said, if you just need to get something that works for a couple of years, and as cheap as possible – then other batteries are still strong contenders.
When you consider the price of lithium batteries you must consider its lifecycle and depth of discharge (DOD). Considering an absorbed glass mat (AGM) battery will enter in at around 500 cycles, lithiums are 5000+ cycles. Not only do they have an increased life (if installed and charged correctly) they are much lighter which is very important when it comes to conversions such as vans, motorhomes, buses and lorries which all carry weight limits.
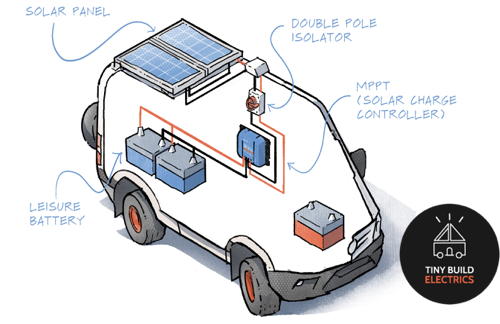
How will you generate power for your van’s electrical system?
This is a really fun part of the van conversion, especially when it comes to harvesting free energy from the sun to power your life. When I first set-out in a van conversion that had a single house panel – and I realised that it was more-or-less sufficient for all my power needs, it blew my mind. All those years of spending thousands on electrical bills – and now I could live, with enough power, for free?! It is amazing!
Solar Power for your Van Conversion
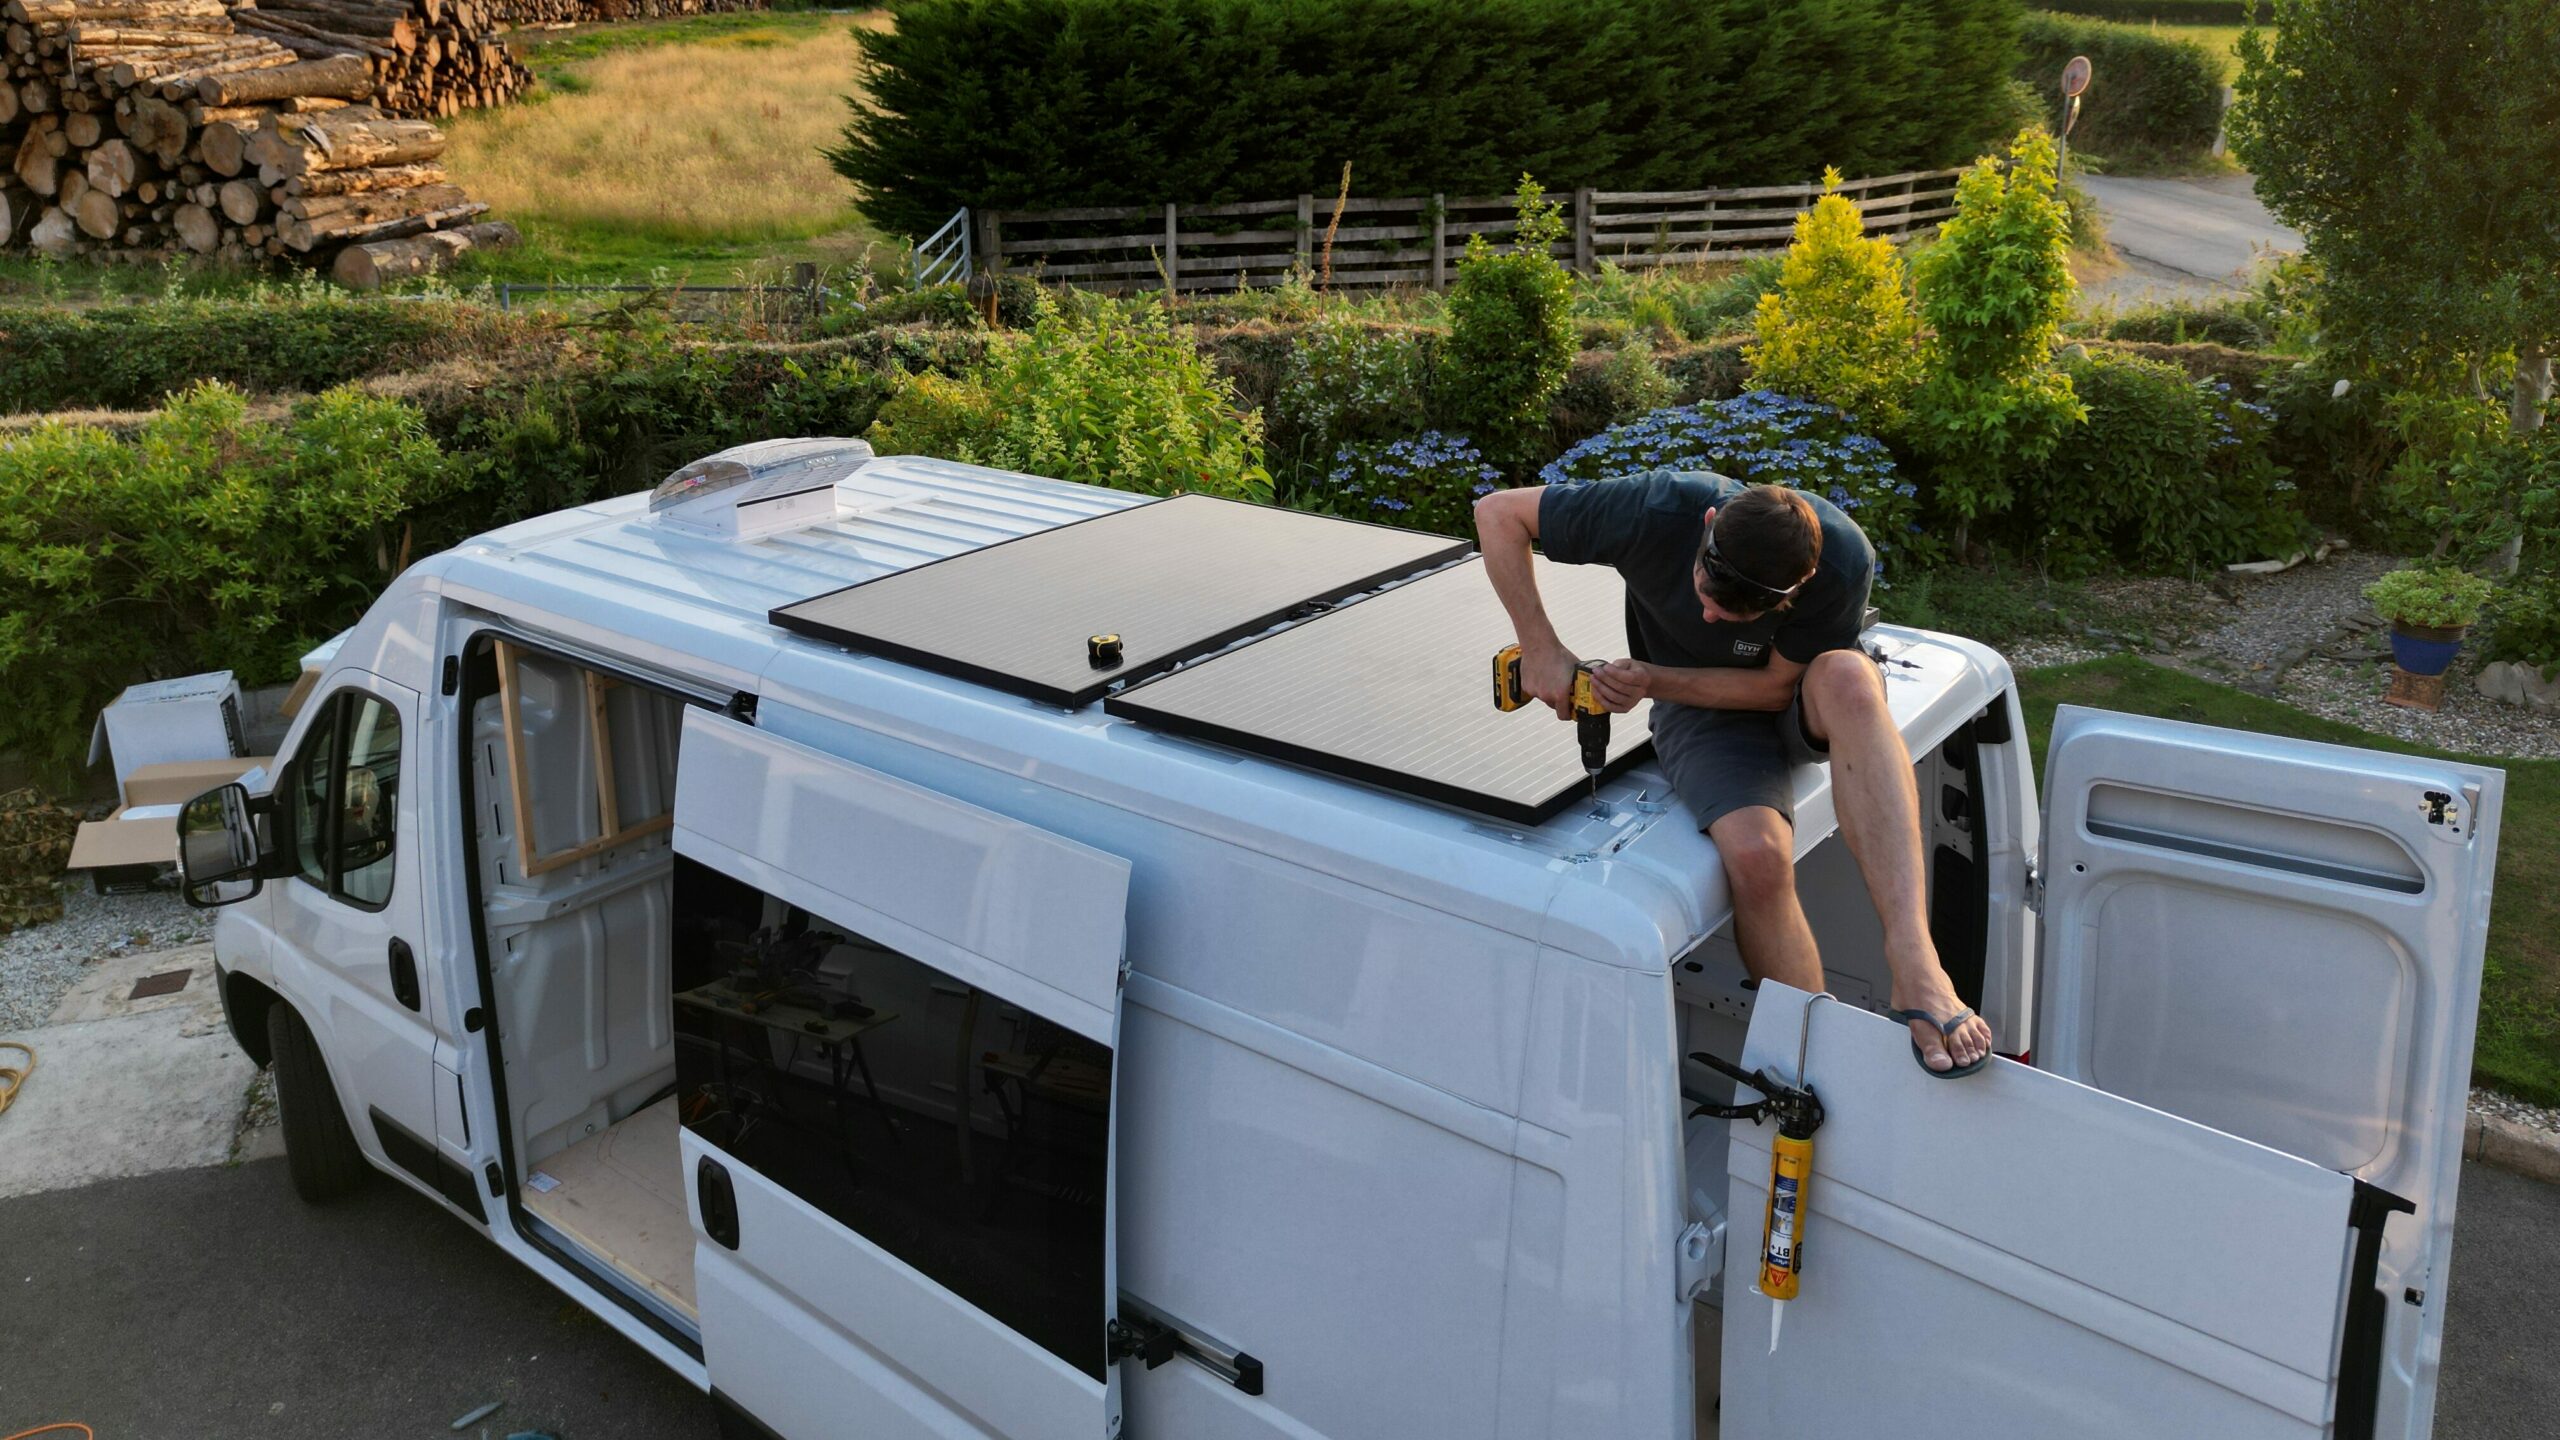
Using solar panels is a really efficient and economical way of charging your batteries. There are, of course, many different types and sizes of panels you can use. In general, I recommend fitting as many solar panels as you possibly can – in the space you have available – but you must take into consideration such items as vents, sports equipment, and satellite dishes, that may cast a shadow onto your solar panels. This could have a detrimental effect on your solar panels’ charging capabilities.
This becomes really important for your design – many people add two big vents on their roof – only later to find out that they cannot fit many solar panels because the vents will cast a shadow and decimate the solar panel output. It is better to think early-on about solar panels and think carefully about what else you put on the roof.
Installing solar panels on a campervan can be a great way to power your adventures and reduce your reliance on traditional sources of energy. Here are some things to consider when planning your installation:
- Power requirements: Determine how much power you need for your campervan by calculating your average daily power usage. This will help you determine how many solar panels you need to install.
- Available space: Consider the available roof space on your campervan, as this will determine the size and number of solar panels you can install. You may also want to consider the orientation of the panels and the amount of sunlight they will receive.
- Type of solar panel: There are two main types of solar panels: monocrystalline and polycrystalline. Monocrystalline panels are more efficient, but also more expensive (they also look cool because they tend to be entirely black). Polycrystalline panels are cheaper but less efficient.
- Solar Charge Controller: A charge controller is necessary to regulate the charging of your battery and prevent overcharging. Make sure to choose a controller that is compatible with your solar panel and battery system. Check out our free solar charge controller calculator.
- Cost: Finally, consider the cost of the solar panel system, including the panels, battery, charge controller, and installation. While a solar panel system can be expensive upfront, it can save you money in the long run by reducing your reliance on campsites. (The author spent 5 years living full-time in an offgrid van, and never once hooked up to mains! Which meant no need to pay any camping fees.)
- Wiring and installation: Proper wiring and installation are critical to the performance and safety of your solar panel system. Consider hiring a professional to install the system, or ensure that you have the knowledge and experience necessary to do it yourself.
There are of course other ways to power your van conversion – and in some use-cases solar panels are not needed at all (for example if you only ever do weekend trips and charge it from the engine, or mains hook up).
Here are the other main ways of powering your van:
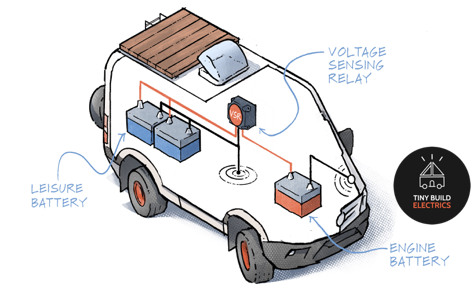
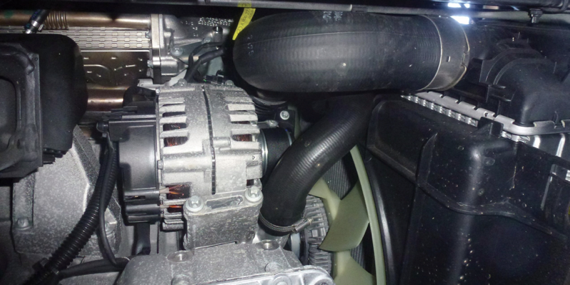
Alternator Charging (Charging from your engine)
Using the alternator of your vehicle is another great way of charging your batteries. If the engine is running and the alternator is spinning then you may as well harness some of this power to help charge your battery bank. There are several ways of achieving this and a few considerations you need to be aware of.
Voltage Sensing Relay
When your engine is running, the alternator produces a charging voltage which is sent to your engine battery. A voltage sensing relay will sense the charge voltage (above 13.7V) and close. Once activated, it will send the charge current towards your leisure batteries to charge them.
As soon as you turn your engine off, the voltage of your engine battery will drop below 13.7V and the relay will deactivate, disengaging the engine battery from the leisure batteries. This is important because you do not want to wake up to a discharged engine battery the following morning. Please note: this method should not be used with batteries that require several stages off charge.
Today, most leisure batteries now require a three stage charge algorithm in order to maintain optimum life cycles, therefore in general, despite how cheap they are to install, we do not recommend this way of charging.
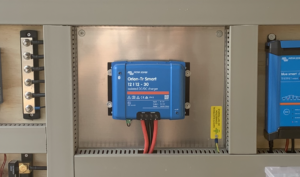
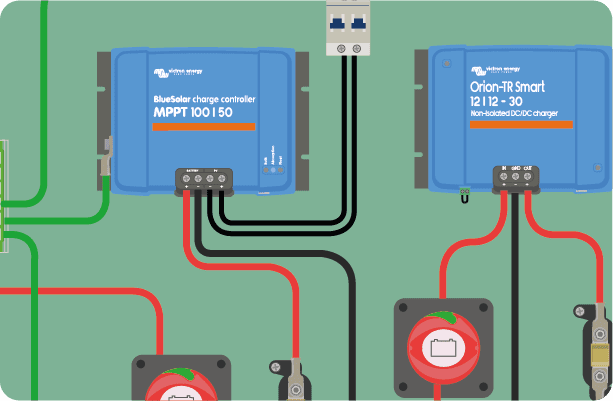
Battery to Battery Charger (DC-DC Charger)
A battery-to-battery charger operates by harnessing the power generated by the vehicle’s alternator and converting it into a sophisticated three-stage charging process for the leisure battery. First, during the ‘bulk charging’ stage, the charger draws maximum current from the alternator to rapidly charge the leisure battery until it reaches a specified voltage threshold.
Once this stage is complete, the charger enters the ‘absorption charging’ phase, where it maintains a constant voltage while gradually reducing the charging current, allowing the battery to absorb energy optimally.
Finally, in the ‘float charging’ stage, the charger provides a low, steady voltage to sustain the battery’s charge without overcharging it. This intelligent three-stage process not only charges the leisure battery efficiently but also prolongs its lifespan by preventing overcharging and excessive voltage fluctuations, ensuring a reliable and sustainable power source for the campervan’s electrical needs.
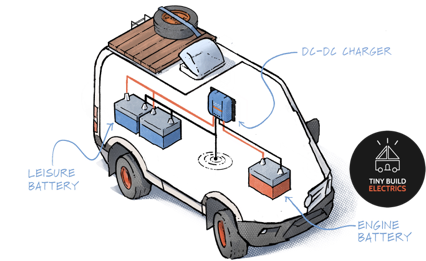
An imporant question: Does your Campervan have a Smart Alternator?
Smart alternators, which are increasingly common in modern vehicles, are designed to prioritise the charging of the vehicle’s main starter battery over leisure batteries. This can lead to insufficient charging of the leisure batteries in a campervan’s electrical system.
By employing a battery-to-battery charger, the smart alternator’s output can be regulated, allowing a controlled and steady charge to be delivered to the leisure batteries. This setup ensures that the leisure batteries receive the appropriate charge they need.
Installing an Inverter in Your Campervan
Inverters work by taking DC power from a battery and converting it into AC power using electronic circuits (AC current is what you have in your house – so many appliances are made for it). The inverter converts the DC power into a high-frequency AC power, which is then transformed into a pure sine wave or modified sine wave AC output using transformers and filters.
Inverters come in different sizes and power ratings, ranging from small inverters that can power a few small appliances to large inverters that can power an entire house. In campervans, most inverters are small to medium-sized and are designed to power a few appliances and electronics.
With an inverter, you can power appliances like hair dryers, TVs, laptops, and other devices that require AC power. This allows you to enjoy the comforts of home while on the road, without having to rely on external power sources like campsites or generators.
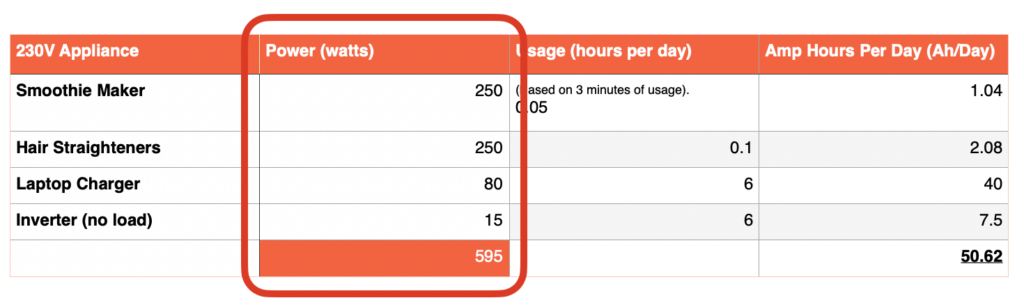
When choosing an inverter you need to refer back to the table earlier in the article. Again, you need to look at the loads in which you will be using your inverter to power.
Taking a look at the chart above, all the 12V-only items have been removed and we are specifically looking at the items that require a single phase, alternating current with a voltage of 230V. The combined wattage of all these items is 595W.
So here a 1000w inverter would be sufficient to power these 230V items concurrently. A smaller, 600w inverter could be comfortably used here, but we would advise going slighter bigger if you are going to allow for future additions.
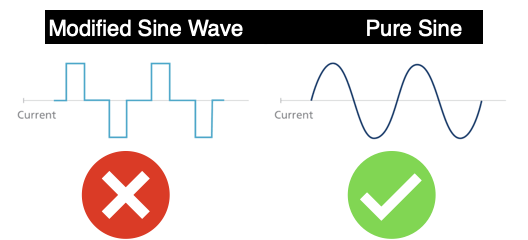
Pure sine wave & modified sine wave inverters
It is advisable that the inverter you purchase is a pure sine wave invertor and NOT a modified sine wave. Put simply, the pure sine wave gives a smoother alternating sine wave which is more friendly towards your electronic items, especially those that have single phase AC motors like smoothie makers and blenders. Modified sine wave gives different wave, it is more jagged and square. This is fine for items like lamps and hair straighteners because they are not reliant upon a true alternating sign wave. But, for the longevity of your system, pure sine wave will run all types of electronic equipment you decide to bring into your campervan.
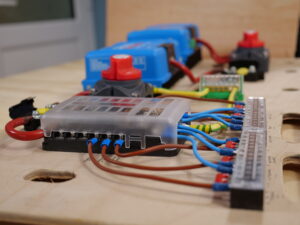
The Importance of System Monitoring in Your Campervan
A battery monitor measures battery voltage and current flow into & out of a battery bank and uses these measurements to accurately track the amount of charge left in the battery bank.
Battery monitoring is key to the longevity of your system. Monitoring your batteries performance will give you the most from your investment, ensuring DOD (depth of discharge) and SOC (state of charge) stay within the manufacturer’s specified parameters. Discharging your batteries too far or not charging them in a required format will damage your batteries and will reduce their life cycles.
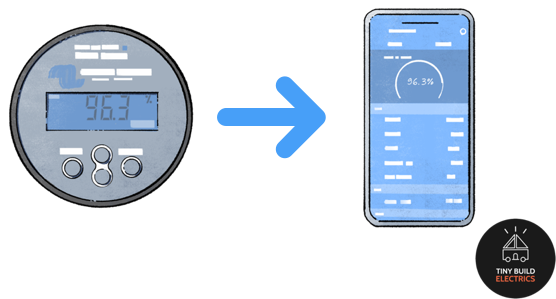
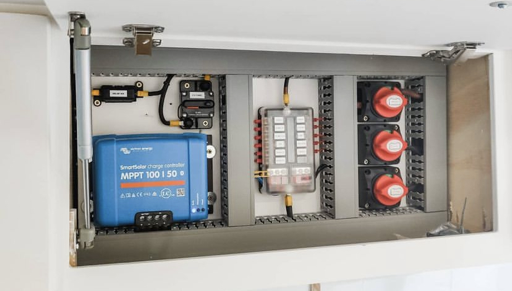
Shunt-based battery monitoring systems, like the Victron Energy BMV-712 or Victron Energy Smart Shunt, are more reliable than simple voltmeters that are traditionally used as a gauge for tracking the state of charge (SOC) of a battery bank.
Most popular battery monitors now come equipped with bluetooth and the option to see the results from the comfort of your mobile phone. This is a great way of keeping track on your system status.
Victron Energy MPPT controllers will monitor the performance of the solar array giving you information on the overall daily yield, maximum voltages from both the panels and batteries all from the comfort of your mobile phone.
I strongly advise fitting a monitoring system in your campervan as well as the charging sources. If you do, it gives you a very accurate of the health of your system. You have probably spent a lot of money on batteries, appliances, and inverters, so the monitoring systems are a must to protect your investment.
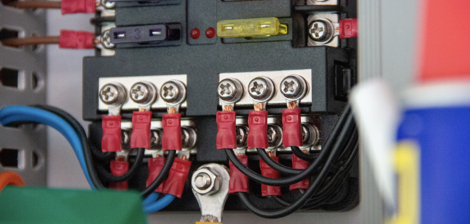
Protecting Your Electrical System
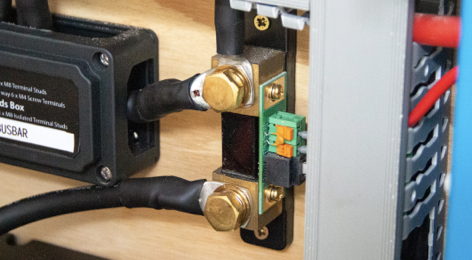
So you have your expensive electrical components, but if something goes wrong you need to be able to protect both them, and the van. Electrical faults are the main cause of fires in camper vans so its important to have proper protections installed within your electrical system. These are not ‘nice to have’ these really are essential – so take some notes!
Fuses
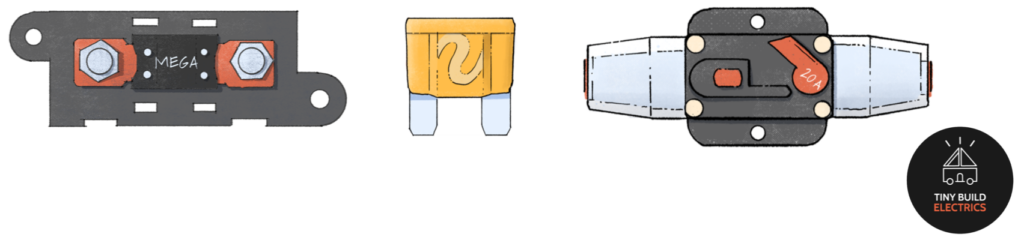
A fuse breaks the circuit during excess current flowing through it. Fuses protect appliances, batteries, cables and, most importantly, the entire van conversion. Without fuses faults are able to go unnoticed, arc against the chassis of the vehicle or, worse, create a fire.
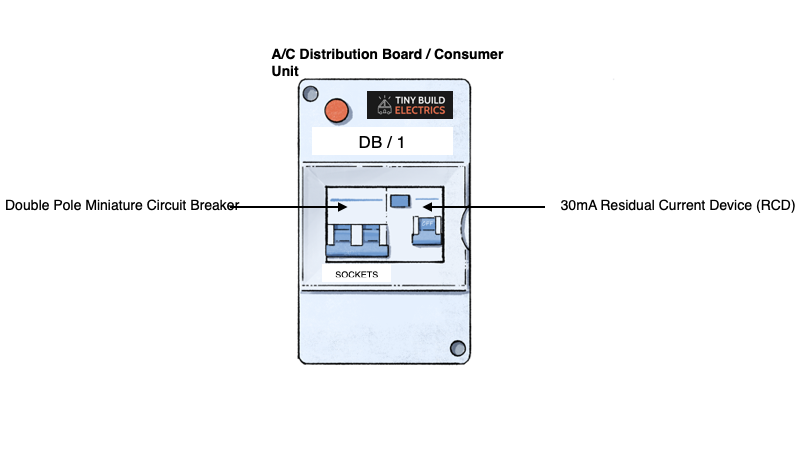
Miniature Circuit Breakers (MCB)
Miniature Circuit Breakers (MCBs) are indispensable devices in electrical systems, offering protection against overcurrents and short circuits. These compact devices are particularly vital for campervan electrical systems, where limited space and safety considerations play crucial roles.

Residual Current Devices (RCD)
A residual current device (RCD) is a safety device that disconnects the supply automatically if there is a fault. RCDs are far more sensitive than normal fuses and circuit breakers and provide additional protection against electric shock.
An RCD monitors the electrical current flowing through one or more circuits that it’s protecting. If the RCD detects current flowing down a path it shouldn’t, it detects an imbalance and the RCD will disconnect the supply extremely quickly, significantly reducing the risk of death or injury.
Read more about campervan electrical safety system.
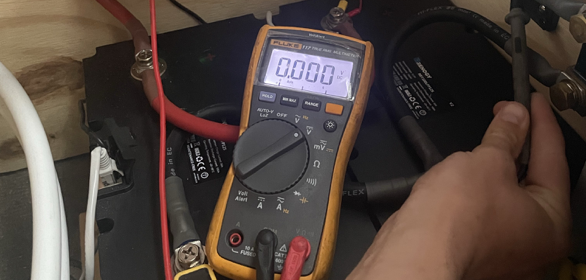
Testing your Camper Van’s Electrical System
Carrying out some basic tests on your campervan electrical system is a great way of ensuring your system is correctly connected but also safe.
First off, it is important to spend some time running your eyes over the installation to ensure everything is connected correctly. Check there are no stray wires and that all connections do not have bare-wire showing.
For the testing of your 230V (mains power) systems, we advise contacting a qualified electrician to test and inspect this part of the installation. The tests conducted require more complex equipment and a portion of the testing is carried out live and therefore needs to be conducted by competent person(s).
Labelling your Electrical System in your Campervan
Labelling is a crucial aspect of any installation. By labelling items, you are future-proofing your system. If a fault were to occur you can easily isolate and locate the circuit in question. I can almost promise you that, despite it seeming obvious during the build, a year later you won’t have a clue!
Also, in an emergency, if an appliance needs shutting down being able to quickly identify isolators and fuses is critical.
If you plan to rent your campervan for other people to use, labelling is a must and will ensure people who are unfamiliar with your build know exactly where everything is located.
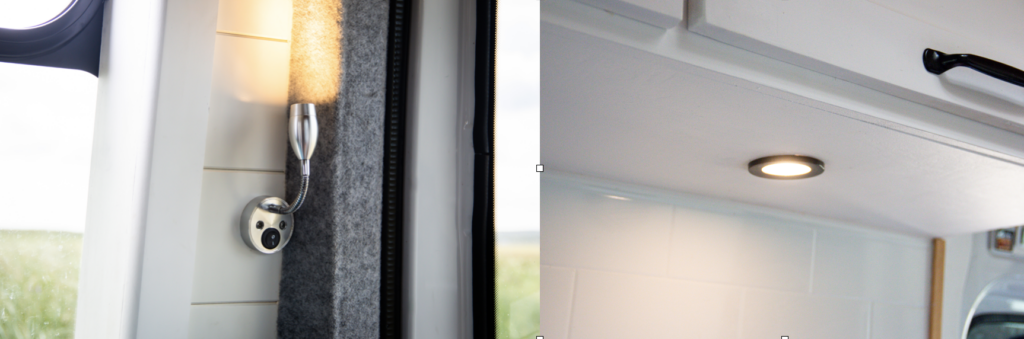
Camper Van Lighting
For me, lighting is one of the most important aspects of a van conversion design and build and it should be planned out from day one. It is not as simple as fitting some lights up on the ceiling at the end of the process!
You need to consider areas you will need to light the most, kitchen countertops, shower rooms and toilet rooms, and also consider the ambience you want to set in your campervan at night time. Personally I like to break the van up in to zones and have the ability to switch on and off different zones – also with a mix of direct and indirect lighting to set different moods. After all, we don’t sit in our house in the evenings with all the main lights on full-blast whilst trying to unwind and relax.
Some comfort lighting is key, fairy lights, strip lights, pelmet lights, low-level cabinetry lights. These small additions make a huge difference to the overall comfort of your campervan.
A well-balanced lighting system in any installation, whether it be a campervan, motorhome, boat or log cabin, can really turn a house into a home.
Outside Lighting
An aspect of the lighting that most van-dwellers forgo is outside lighting.
When sat outside your campervan in the evenings you will want to light the outdoors area. Outside lighting is great if you plan to take pets with you in your campervan, easy to keep an eye on them when let out at night.
If you have a tall step up into your campervan it may be worth considering lighting the step area to avoid tripping when entering your vehicle at night.

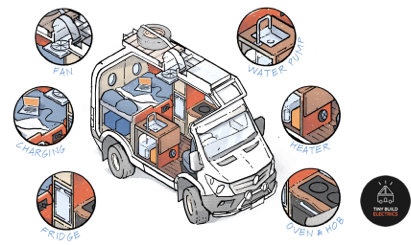
Choosing Vampervan Appliances
Appliances and their locations are key to any ergonomic build. Fridges, fans, heaters, water pumps and water heaters are key to a tiny build, especially if you plan to live in it full-time.
Not only is there a lot of research involved in what type of appliance you require, but it is also worth dedicating plenty of planning time to the locations of each appliance. Basic points like ensuring your fridge is in or near your kitchen and your fan is located in an area to remove any cooking smells, steam or smoke.
All of this planning will contribute to your electrical system and help at the installation stage. Knowing where you plan to run your cables as well as your switch and socket locations. Envisaging these locations and runs whilst standing in an empty van is a great way of preparing for your installation.
Ideally, each appliance will have an isolation via a switch. Whether that be local (next to or near the appliance) or remote (in a cupboard or electrical panel).
Adhering to Regulations when Wiring Your Campervan
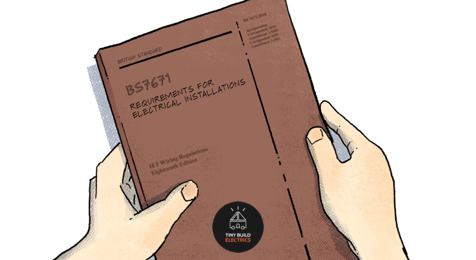
Using the IET Wiring Regulations to ensure your campervan’s electrical system is safe and compliant is of utmost importance for several reasons.
These regulations, also known as British Standard 7671, provide comprehensive guidelines for electrical installations, guaranteeing the highest standards of safety and functionality and are adehered to all over the world. Compliance with these regulations will ensure that your campervan’s electrical system is designed and installed correctly, reducing the risk of electrical faults, short circuits, or fires.
By adhering to these industry standards, you ensure that your campervan meets the legal requirements, providing you with peace of mind during your travels and avoiding potential penalties for non-compliance.
There are also a set of regulations specific to motor caravans called the British Standard 1648. These regulations specify safety, health and functional requirements for 12 V direct current (DC) extra low voltage (ELV) electrical installations for habitation aspects of motor caravans and caravans.
If you require help with compliance and understanding these regulations then be sure to book in with us us for a one-to-one consultation. With a consultation, we can help you with your design, installation, commissioning of your system and, most importantly, compliance to the regulations.
We will also supply you with a detailed schematic diagram of your electrical system, making your installation process easier than ever.
Build your own adventure
The guide anyone can use to convert a van into a camper! With over $350 worth of savings inside
Do you want to live vanlife at zero cost?
Nate Murphy knows how to buy vans, convert them quickly and efficiently - use them for years - and then sell them for a profit. This can make vanlife not just free, but profitable!
He has successfully done this for years and he teaches his friends and students to do exactly the same. It is not obvious, but anyone can do it if they have the knowledge!
Join Nate at his free online training (running today) and he will teach you exactly how he does this!


The Van Conversion Guide (14th Edition)
The guide anyone can use to convert a van into a camper! This best-selling guide, now in its 14th Edition, has been used by thousands of people to transform a van into a camper.
- 150+ page eBook
- Helps you convert any kind of van
- Diagrams for all the main systems
- FREE mini-course - 28 video tutorials
