How To Build A Campervan Solar System (Ultimate DIY Guide)
last updated: Aug 20, 2023
Are you looking to convert a campervan that can take you off-grid on an adventurous road trip?
Or are you looking to live full-time in a van, and need power for the essentials?
The key to getting off-grid and living in a van, is having the energy to power your electrics.
The best way to do that?
Solar power!
Not only is solar energy awesome for the environment, it’s also essentially free energy (after the initial setup costs) to run your campervan electronics!
This campervan solar system guide is going to teach you everything there is to know about solar power, how to install your own solar system, and even demonstrate three separate examples of different vanlifers’ solar systems.
Let’s get lost in…
Part 1: Campervan Solar System Components

Before jumping into exactly how a campervan solar system works, here is a quick breakdown of all of the different components that go into a camper van solar unit.
Individual units may vary slightly. However, these components are generally what make up the solar system:
- Solar Panels: Solar panels for campervans sit atop the van, and absorb energy from the sun and then harness that energy into a form of electricity that is usable in the campervan. There are two different types of solar panels: monocrystalline and polycrystalline.
- Wiring: The campervan solar panel wiring is the medium where the electricity flows from your panels to your leisure battery. There are two different ways to wire your solar panels: parallel and in a series.
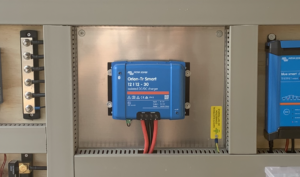
- Charge Controller: A solar charge controller is the piece of equipment that regulates the voltage of the electrical current that flows into your campervan’s battery.
- Battery: This is where the power to run your various campervan power loads is stored. The van solar panels will recharge your battery.
- Mounting kit: A solar panel mounting kit includes the hardware necessary to install your van’s solar panels.
Part 2: How a Campervan Solar System Works
In a nutshell, a campervan solar system works by absorbing the power of the sun, and turning it into electricity that will charge your campervan’s leisure battery, thus powering all of the electronics in your campervan!
A campervan solar system can be broken down into four main parts: the solar panels, the wiring, the charge controller, and the wiring.
Each part is equally important, and they all work together to charge your van’s battery!
The Solar Panels

Solar panels are the key components of your campervan’s solar system. While the sun is shining, it is emitting solar radiation.
When the sun shines onto your solar panels, they are able to absorb the sun’s energy through the PV cells that are in your solar panels.
PV is short for photovoltaic, which refers to the ability to turn sunlight into a usable form of energy.
PV cells are made from silicon, and are a part of the solar panel that absorbs the sun and turns it into a usable form of energy for your campervan!
There are two different primary types of solar panels: Monocrystalline and Polycrystalline.
Monocrystalline:
Also known as mono solar panels, the PV cells in monocrystalline solar panels are each made from one individual silicon crystal.
Monocrystalline solar panels are black.
Pros of monocrystalline solar panels:
- Monocrystalline panels are more efficient than polycrystalline panels.
- Monocrystalline panels take up less roof space than polycrystalline panels.
- Monocrystalline panels have a longer lifespan than polycrystalline panels.
- Monocrystalline panels work very well in very hot temperatures.
Cons of monocrystalline solar panels:
- They are more expensive than polycrystalline panels.
- They can short circuit if they get covered in snow, and do not perform as well in cold weather.
Polycrystalline:
Also known as poly solar panels, the PV cells in polycrystalline solar panels are made from multiple pieces of silicon crystals fused together, rather than one individual silicon crystal, like in monocrystalline panels.
Polycrystalline solar panels have a blue hue.
Pros of polycrystalline solar panels:
- Polycrystalline panels are less expensive than monocrystalline panels.
- Polycrystalline panels tend to function better in colder environments than monocrystalline panels.
Cons of polycrystalline solar panels:
- Polycrystalline panels are less efficient than monocrystalline.
- Because they are less efficient, more polycrystalline panels will be needed to generate the same amount of energy as monocrystalline panels.
Once the sun’s radiation is turned into electricity, it flows into the wiring of your solar panels. From there, it flows to the charge controller.
The Wiring
The wiring of your solar panels is crucial, because it is through your wiring that the electrical current eventually flows into your camperan’s leisure battery.
To create a flow of energy, the negative terminal of a solar panel must be wired to the positive terminal of another solar panel.
There are two primary different ways to wire your solar panels: Series and Parallel.
Series
Solar panels are wired in a series when the positive terminal of one panel is connected to the negative terminal of the next panel.
When solar panels are wired in a series, the voltages are added together.
Pros of wiring solar panels in a series:
- It is easier to wire solar panels in a series.
- If none of the panels are obscured, wiring in a series will have a higher overall efficiency level than in parallel.
Cons of wiring solar panels in a series:
- Even if one solar panel is shaded, the overall productivity of the solar system massively decreases.
Parallel
Solar panels are wired in parallel when the positive terminal of one solar panel is wired to the positive terminal in another solar panel, and when the negative terminal of one solar panel is wired to the negative terminal of another solar panel.
The positive to positive and negative to negative connections are made with branch connectors.
When solar panels are wired in parallel, the amps are added together.
Pros of wiring solar panels in parallel:
- If one panel is damaged or partially shaded, the overall system will still perform well.
Cons of wiring solar panels in parallel:
- You will need bigger and more expensive wires.
Which method of solar panel wiring is best for you?
When deciding if you should wire your solar panels in series or in parallel, there is no ‘one size fits all answer’. It really depends on your overall electrical system.
Keep in mind, wiring solar panels in series will increase the voltage. Inverters have a specific voltage operating window, so wiring your solar panels in a series could be crucial to helping you meet that window.
However, wiring in parallel allows you to have more amperage without increasing your voltage, which could also be an advantage depending on what inverter you’re using.
Overall, a combination of wiring in series and in parallel may work best for your campervan. The exact way to wire solar panels will vary for everyone, so it is best to keep your own specific solar kit in mind and decide the optimal method for that system.
The Charge Controller
Once the solar panels are installed and solar panel wiring is completed, the panels will be producing electricity!
The next step in the campervan solar setup is where the solar charge controller comes into play.
A solar charge controller regulates the voltage that the solar panels create.
Campervan leisure batteries need a specific voltage to run, so it is very important that this current passes first through the solar charge controller before going to the battery.
There are two different types of solar charge controllers: pulse with modulation (PWM) and maximum power point tracking (MPPT).
Pulse with Modulation (PWM)
A PWM solar charger is the cheaper and less expensive of the two.
Essentially, a pulse with modulation solar charger works by lowering the voltage flowing from the solar panels to a voltage that can safely charge the campervan’s leisure battery.
Maximum Power Point Tracking (MPPT)
MPPT solar charge controllers are more expensive than PWM controllers, but they are also more efficient.
Rather than decrease the voltage like PWM controllers, Maximum Power Point Tracking solar controllers are able to operate at the solar panel’s maximum power point, and regulate that current to charge the van’s leisure battery.
As a result, MPPT charge controllers can be 40% more efficient than PWM charge controllers!
Battery
Once the voltage has been regulated through the solar charge controller, the battery can now be recharged by the solar panels!
Then, that energy can be used to power all of your campervan electronics.
Part 3: Campervan Solar System Considerations
Before jumping into the ins and outs of installing and choosing your campervan solar setup, there are a few important key factors to take into consideration regarding your solar system, and exactly how much solar power you need.
How to calculate how much solar power you need
Let’s say your campervan’s leisure battery holds 100 AH. That is the equivalent of 1200 watts. Now, let’s say there are 5 hours of sunlight per day in your location.
To calculate how much solar is needed to charge your battery, plug those numbers into this equation:
Desired Solar Power (w)= leisure battery(w)/ hours of sunlight(h)
Desired Solar Power (w)= 1200w/ 5 hours of sunlight
Desired Solar Power= 240w
If you want to have enough watts of solar power to be able to charge a 100AH battery, and there are roughly 5 hours of sunlight per day, you will need approximately 240 watts of solar to recharge your battery.
However, this is by no means a concrete number, and it is affected by a few different factors, including:
How much sun will your panels be receiving?
If you’re going to be driving your campervan around in the desert, you will need fewer watts of solar than if you take your campervan to a cold, dark, wintery location.
If you’re driving near the equator, you’re going to get far more sunlight than if you’re driving in the Arctic Circle!
Do you have other methods of recharging your battery?
If you have other methods of recharging your leisure battery besides solar, whether through using shore power or an alternator, then it’s okay if your leisure battery is larger than your solar panels can recharge.
Part 4: Different Types of Campervan Solar Systems
The Simple Campervan Solar System
If you’re looking to convert a van with a simple solar panel system on a budget, you can do so for roughly $240.

This system will need the following components:
- Inverter $35
- 100 watt solar panel $100
- Solar charge controller $50
- Wiring $20
- Solar Panel Mounting Kit $32
This camper solar system is ideal for vanlifers who only run a handful of electrics, like lights, a few small fans, and need to charge their electronic devices.
Additionally, this is a sufficient camper van solar power setup for those traveling in extremely sunny locations, so their solar panels receive ample sunlight to charge their batteries!

With this amount of solar, especially in sunny locations, you should have ample energy to recharge your batteries and even get off-grid for a few days.
However, if you’re looking to have a heavier power load in your campervan, you may want to read on for the mid-range campervan solar system.
Full video → Ezra’s Van Conversion
The Mid-Range Campervan Solar System
If you’re looking to convert a van with a mid-range campervan solar system, you can do so for roughly $760.

If you’re looking to run a slightly larger load, and get off-grid for longer amounts of time, then this camper van solar system should be more than enough to satisfy your needs!
This system will need the following components:
- Pure sine inverter $230
- 3×100 watt solar panels $300
- Solar charge controller $130
- 3x Solar Panel Mounting Kit $100

With this solar setup, there is enough solar power to recharge 2x140ah batteries daily.
This means there is more than enough electricity in this van to stay off-grid, and run a small load of electrics like lights, a water pump, recharge all my electrics, power a fridge, and more!
Plus, with a bigger solar setup you can get away with spending time in shady locations. You’ll still have plenty of solar to recharge your batteries.
This is an awesome solar setup that can fully satisfy the power loads of many vanlifers.
However, if you’re looking to get off-grid for long periods of time, or have a huge power load, you might be interested in the high-end campervan solar system!
Full video → My First Van Conversion
The High-End Campervan Solar System
If you’re looking to convert a van with a high-end campervan solar system, you can do so for roughly $1,875.

This system will need the following components:
- 3000 watt 12V sine inverter $765
- Solar display $50
- 4x 130 watt solar panels $800
- Solar charge controller $130
- 4x Solar Panel Mounting Kit $128
We know that’s a pretty hefty price tag. However, this is enough solar power to recharge 2×200 watt Lithium batteries that are capable of running:
- A water pump
- Lights
- Fans
- A fridge
- A Nespresso machine
- A milk steamer
- A blender
- A hair drier
- A heater
- All of the electronics for two full time working digital nomads!
If the above items sound like electrics that you may want in your van conversion, this is potentially the type of van solar setup you should be budgeting for in your overall cost of the van conversion.

Full video → Incredible Luxury Van Conversion
Part 5: How to Install a Campervan Solar System
Now that you have a better idea of the different ranges of van solar systems, it is time to dive into the actual installation process!
Step 1: Order ALL of your campervan solar system pieces
Before moving forward with the installation of your campervan solar system, it is a great idea to order and already have all of your system’s components in front of you.
This way, you can start the installation process and not experience any holdups in the middle of installation due to a missing part.
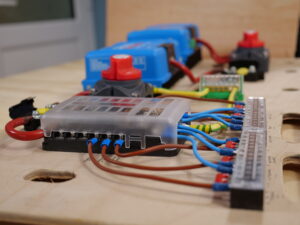
Step 2: Create a wiring diagram
Once you have all of your campervan solar setup pieces in front of you, the next step is to create a wiring diagram.
In this diagram, you’ll hash out exactly how you’ll wire your panels together, and through the charge controller and battery.
Step 3: Mount your solar panels
After you’ve completed the wiring diagram, it’s time to mount your solar panels!
When mounting your solar panels, you’ll want to be sure your van’s roof is totally clean, and mark everywhere you plan to cut and drill ahead of time to ensure accuracy.
Step 4: Complete wiring
Once you’ve mounted your panels, it’s time to go ahead and wire them together!
Whether you’ve opted for series wiring, parallel wiring, or a combination of both, this is where you’ll put the whole system together so electricity can flow from your panels, to your charge controller, to your battery!
** To learn exactly how to install, mount, and wire your solar panels, I highly recommend checking out my ebook The Van Conversion Guide!
The ebook includes the exact parts, tools, and steps you will need in order to not only mount and install your solar panels, but also your campervan electrical system, and entire van conversion!**
Step 5: Perform a safety check
Once your solar panels are mounted and the wiring is completed, it’s time to perform a safety check.
A safety check will not only double-check that your system is running safely, but it will also ensure every part is functioning properly.
This will protect your valuable campervan solar equipment, as well as protect yourself and your loved ones from the dangers of faulty electrical systems. It’s always a good idea to have a professional electrician look over your system for maximum safety.
Part 6: Maintenance
Just like your van’s engine needs servicing to continue running smoothly, you’ll want to perform some maintenance on your solar panels from time to time to keep them running smoothly.
One of the key ways to maintain well-functioning solar panels is to clean them and remove debris.
Dirty solar panels covered in leaves are going to perform far less efficiently than clean and unobstructed solar panels.
If you frequently check on and clean your panels, you’ll not only be extending the lifespan of your panels, but you will also be allowing them to provide even more energy to your battery, allowing you to stay off-grid longer.
Campervan Solar System Final Thoughts
That’s a wrap on our campervan solar guide!
I hope this guide has helped you understand how solar power works, and has given you a good idea of what type of solar setup you want for your own van conversion!
Whether you’re looking for a minimal solar setup, or need enough juice to power everything from your blender to your hair drier, I hope you’ve gained a little clarity on what your van solar system needs.
Which of these campervan solar systems would you install in your campervan?
Build your own adventure
The guide anyone can use to convert a van into a camper! With over $350 worth of savings inside
Do you want to live vanlife at zero cost?
Nate Murphy knows how to buy vans, convert them quickly and efficiently - use them for years - and then sell them for a profit. This can make vanlife not just free, but profitable!
He has successfully done this for years and he teaches his friends and students to do exactly the same. It is not obvious, but anyone can do it if they have the knowledge!
Join Nate at his free online training (running today) and he will teach you exactly how he does this!


The Van Conversion Guide (14th Edition)
The guide anyone can use to convert a van into a camper! This best-selling guide, now in its 14th Edition, has been used by thousands of people to transform a van into a camper.
- 150+ page eBook
- Helps you convert any kind of van
- Diagrams for all the main systems
- FREE mini-course - 28 video tutorials