How to Build a Campervan In 12 Simple Steps!
last updated: Feb 24, 2022
Many people dream of van life, but get stuck with the seemingly massive hurdle “how do I even BUILD a campervan!?”
Well, you’ve come to the right place.
I have been building van conversions now for the best part of a decade, with my original build racking up more than 12 million views.
Since then, I’ve covered all kinds of van builds ranging from cheaper conversions right through to rugged 4X4 off-road Sprinter conversions.
And what’s one thing most of these vans have had in common?
The people converting them were first-time builders!
Meaning, anyone can do it. And in the guide below I’m going to show you step-by-step how to build a campervan that suits you perfectly!
Let’s get stuck in.
By the way, if you’re reading this guide and are serious about step-by-step campervan conversion, I highly recommend downloading The Van Conversion Guide.
It supplements this post by providing step by step guides along with 25 videos with the nitty gritty on installing electricity, building your furniture, and everything else that goes into a campervan!

Step One: Decide on Your Campervan Conversion Budget
Before you get started on your van to camper conversion, it is important to know what your budget is for the conversion.
Fortunately, there is a wide range of costs when it comes to campervan conversion. It is possible to convert a campervan on a very low budget, and if you have an unlimited budget, you can make your campervan conversion as luxurious or kitted out as you desire.
Roughly, the cost of a camper conversion (not including the van itself) will run anywhere from $2000-$20,000.
The van will add an additional $2000-$80,000 to that total.
I know that’s a huge price range, and to help you set a more accurate budget, I’ve written a guide on the full breakdown of the cost of a campervan conversion!
Step Two: Choose Your Van
The next step after setting your budget for converting a van, is to choose the van itself!
Choosing the right van is crucial when converting a van for camping, as you’ll want to be certain the van you choose well suits your needs for van life.
What to Consider When Choosing a Campervan to Convert
When choosing a campervan to convert, you’ll want to consider a variety of important factors, including the following:
- Can you work on your van?
If you’re mechanically inclined, you may want a sick older van like a T2 Volkswagon (Vanagon) that needs mechanical work from time to time.
If not, then a newer van that needs less work may be better.
- Is the ability to fully stand up in your van conversion a priority?
This is very important. Anyone wanting to be able to stand up in their campervan will want a van with a higher roof, like a Ford Transit.
- How many people will be traveling in your van?
Most likely, someone traveling in the van solo will need less space than a couple or family. If you plan to share your camperized van with others, it’s best to purchase a larger van with a longer wheelbase.
- Will you be stealth camping?
Anyone who plans on stealth camping on city streets in their campervan will likely want a van that looks more like a cargo van than a van someone is living in, like a Nissan NV or Ram Promaster.
While the best van to buy to convert to a campervan varies for everyone, the top three seem to repeatedly include:
1. The Sprinter Van

Sprinter Vans are by far the most popular vans for converting a van to a camper van due to their reliability, size, diesel engine, and size and shape.
Read More: Best Sprinter Van Conversions
2. The Ram Promaster

The Ram Promaster is another one of the most popular vans for campervan conversion due to its width, maneuverability, and fuel efficiency.
Read More: Best Ram Promaster Van Conversions
3. The Ford Transit

The Ford Transit is also incredibly popular due to their affordability, and because they are one of the tallest vans on the market.
Read More: Best Sprinter Van Conversions
If you’re still wondering which van to build in into a campervan conversion, check out our super in-depth post on the best vans for campervan conversion! It covers tons of vans, their prices, and more.
Where to Find a Van to Buy
- Dealer
A local car dealership will be able to hook you up with a high quality used or new van! This is a quick and easy way to buy a campervan if you’re looking to buy one sooner rather than later.
Keep in mind that prices from the dealer do tend to be higher than other sources, although vans purchased from a dealer are more likely to be free of any serious problems.
- Craigslist
Craigslist is a great resource for finding used vans. It’s easy to use, and is also a great way to see how much vans are selling for in other parts of the world, to ensure you get a good price.
Buying a van from a stranger on Craigslist can be risky though, and if you go this route, I highly recommend meeting the seller at a mechanic so they can look the van over before purchasing.
- Word of Mouth
If you tell everyone you know you’re trying to buy a campervan, someone you know through the grapevine may be selling exactly what you’re looking for!
Plus, buying a van or any vehicle can be a difficult process and it’s great to get help with the process.
- Facebook Groups
Facebook groups are helpful with everything these days, even with finding a van to buy!
To find vans on Facebook, be sure to check Facebook Marketplace, as well as classified facebook groups for different towns!
Step Three: Choose your Campervan Layout
The next step of a van to camper conversion is to choose your campervan layout!
An ideal campervan layout should take all of your van life needs into consideration, as well as be feasible with the van you have.
For example, if you have a taller van, you may want to opt for more overhead storage, etc.
Some important elements to consider when choosing your campervan layout include:
- Will you want to work in your van?
If you plan on working in your van to camper conversion, you’ll definitely want to include a workspace in your van layout like this one!

- How many people does the van need to sleep?
This is a huge determining factor in your campervan layout! A campervan layout for a solo traveler will look very different than a campervan layout for a family.
- Do you want a bathroom with a shower inside the van?
If you want a separate space for a bathroom in the campervan, it’ll be important to include this in your layout.
- What are your storage space needs?
Some campervan layouts offer more storage space than others. Be sure to factor your storage needs into your campervan conversion layout!
While there are seemingly infinite possibilities for different campervan layouts, some of the more popular seem to be:
1. Raised Platform Bed in the Back

This is a great layout for couples or solo travelers. It features the bed in the back, and parallel counters running throughout the van.
Perpendicular to the bed is a bench seat, and a table slides out from the fixed platform bed to serve as a workspace and/ or dining table.
2. Table Bed in the Back

Another incredibly popular campervan layout features a table bed in the back of the van, with the kitchen against the cab!
3. Bed Against the Cab

This campervan layout features a couch against the cab that converts to a bed, with the kitchen along the same wall as the door.
This opens up space in the back of the van for a bathroom, workspace, or both!
While variations of these popular campervan layout plans are used frequently and work great in many campervan conversions, there are still many more factors to consider when choosing your campervan layout.
Read more: Best Campervan Bed Ideas
Step Four: Order and Purchase Materials
It may sound self explanatory, but one of the most important steps early on in the van to campervan conversion process is to buy ALL of the materials you’re going to need for your conversion!
As soon as you’ve set your layout, it’s a good idea to make a big list of everything you will possibly need for your campervan conversion, and then go out and buy it or order it all online before starting the conversion.
This is particularly important when it comes to unique and specific elements in your van like a specific toilet or fridge you want.
These types of items can sell out quickly and get placed on backorder, so the earlier your order it, the less time it’ll ultimately take to complete your van camping conversion.
Plus, there is nothing more frustrating than being in the middle of building, realizing you’re missing a material or tool and having to run to the store to buy in order to continue with the conversion.
Step Five: Strip the Van and Make Initial Cuts
After buying everything needed for the conversion, it’s time to finally get started on the conversion itself!
The first thing you’ll have to do is strip the van if it’s not stripped already. One thing that’s particularly helpful with this is a crowbar.
You’ll likely want to remove things like seats, seatbelts, light fixtures, carpet from the roof, and flooring.
Once the van is stripped and cleaned, you’re now all set with a blank canvas to work on!
What to Cut into our Campervan
What you’ll need to cut into your campervan will be:
- Windows
- Ventilation
- Skylight
Because this is one of the initial steps in a campervan conversion, it’s important to have ordered these materials early on so you can move forward with the convert a van to camper process!
To make the process of cutting into your van easier, be sure to go slow, use masking tape to protect your van’s paint, and follow the golden rule- measure twice cut once!
Additionally, before cutting into your campervan, it is a good idea to know exactly where you want all of your furniture to be, and mark it out in the van with masking tape.
This way, your windows will be in the appropriate places relative to the furniture!
You can also even plan to put your ventilation fan close to the shower (if you decide to include one in your van) to properly ventilate the shower and prevent any mold or mildew!
Good ventilation in the van will be like having air conditioning- it’s crucial.
Step Six: Insulate the Van
Once your windows and ventilation are set, it’s now time for one of the most important components of a convert van- the insulation!
How to Insulate the Floors
To insulate the floors of your campervan, you’ll want to cover them in insulation boards and cover those insulation boards in plywood.
To attach the insulation boards, you can either use glue or expanding foam as a fixant. Glue is a little neater, although the expanding fixant takes much less time to dry!
To attach the insulation foil, you can screw it into the foam boards, and then seal the edges with gaffa tape.
How to Insulate the Walls and Doors
To insulate the walls and doors of your campervan, you’ll want to once again use foam boards, and then cover the foam boards in insulation foil.
How to Insulate the Roof
To insulate the roof, simply add Celotex 30mm foam boards, and cover them in insulation foil.
What Insulation Materials to Use When Building a Campervan?
There are a large variety of different types of insulation materials. The method I described seems to be the easiest way to insulate a campervan.
The type of insulation you use in your campervan, as well as the thickness of the insulation depends on a few different factors, namely your budget, and the type of weather you’ll be traveling in.
If you’ll be taking your campervan conversion in extremely cold weather, it is well worth it to invest in quality insulation.
Additionally, the thicker your insulation on the walls and roof, the less standing room you’ll have in the campervan.
Step Seven: Build the Framework and Furniture
After insulating your van build, it is now time to build the framework and furniture of the campervan! This is essentially going to be building the bones of your campervan, and then filling them in with your furniture!
This step consists of building things like:
- The Bed
- The Countertops and Kitchen
- The Bathroom
- The Living Room
Before building these items into your campervan, it is a good idea to know exactly where you’re going to want to put items like light switches, outlets, and any other sort of power control panels, so they’re not blocked by anything.
Additionally, it is a good idea to mark where everything is going to be with masking tape, if you haven’t already done this.
By doing this, you can better visualize what your furniture will look like in the van, and how big everything needs to be, so you can make any adjustments necessary before the furniture is already set in the van.
When building the furniture, you’ll first want to install studs all over the campervan that will serve as the support for your furniture. Plus, later on you can attach the material for the walls directly to the studs!
Then, once all of the framework is laid, you can go ahead and build the actual furniture itself!
Building the Bed

Depending on the type of bed you want in a campervan, this process will of course differ. However, to build a campervan bed you will generally want to use several pieces of timber battens for supports, and a large piece of plywood for the bed frame itself!
Building the Kitchen

For the kitchen and cabinets, you’ll want to know exactly where all of the appliances are going to ensure there will be space for them.
While building the kitchen cabinets and counters, the first step will be to build their frame. Once again, this will vary greatly depending on what you want your kitchen to look like.
However, generally for this process you will be using a set of dimensional lumber to build the frame of the kitchen, and pieces of plywood to fill it out.
Depending on your preference and budget, you may also want to use a unique piece of live edge wood for the countertop, or invest in a butcher’s block countertop.
Building the Bathroom

For the bathroom, if you decide to include a separate space in your campervan conversion for it you’ll want to build out a separate stud wall for it, and then close it off with pieces of plywood.
You’ll want to install a shower pan for the water to drain from, as well as waterproof the walls!
If you don’t have any carpentry experience, the process of building furniture into your campervan can be daunting. To simplify this process, I’ve written an Ebook, The Van Conversion Guide that covers all aspects of how to build a campervan in depth, with video guides, and there are specific sections that cover exactly how to build these components!
Read More: Best Campervans With Bathrooms
Step Eight: Floors and Wall
Please note: This step is interchangeable with step seven, and the order in which you complete these steps is up to you.
With that said, it is much, much easier to lay the floor and walls before building all of your campervan’s furniture, as you can more or less work with straight lines, and not have to cut around furniture.
However, if you are using expensive and high-quality wood for your walls and floors, you probably won’t want to waste that material by having it be covered up.
The Floors
At this point in the step by step campervan conversion process, your floors likely are just a big piece of plywood.
While you can certainly leave it like that for a simple campervan conversion, you’ll likely want to cover it up with some nice van flooring.
Some common van flooring materials include:
- Cork Flooring
Cork flooring is the best sustainable and non-toxic option for campervan flooring! It is also more expensive than other flooring options like vinyl.
- Vinyl
Vinyl flooring is the most popular flooring material for campervans. This is due to its reasonable prices, durability, and wood-like appearance!
- Hardwood
Hardwood looks amazing in any home, including a campervan! However, it is expensive, heavy, and more prone to mold than the other flooring materials.
The Walls and Ceiling

What materials you decide to use for your walls and ceiling will greatly affect the look of your campervan, so choose carefully! Some of the most popular materials for campervan walls and ceilings include:
- Tongue and Groove Planks
This is more difficult to install but looks lovely in the campervan. Pine, as shown in the van above, is one of the most popular choices, due to it being affordable and light and airy!
- Plywood
This is affordable and easy to install but will need to be painted.
- Finished Hardboard Sheets
These are easy to install and look good, but they are not as durable as plywood or tongue and groove cladding.
To build the walls and ceiling, you can simply attach your material directly to the studs, and if you chose plywood or cladding, paint them after they are attached!
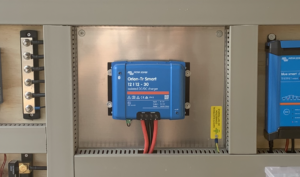
Step Nine: Solar and Electricity!
The next step of your DIY van conversion is to install the electrical system! This is an incredibly important step as it makes your van self-sufficient.
How Much Power do you Need in your Van?
Before setting up the electrical system in your campervan, you’ll want to figure out how much power you will be using in your campervan conversion.
For example, will you be powering a fridge or any other kitchen appliances?
How many lights do you want in your van? How many electronics will you be charging?
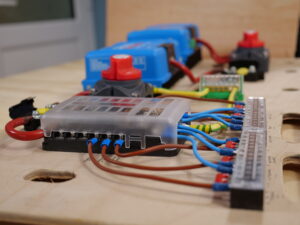
What Components are Needed to Power your Campervan
After figuring out how much power you need in your campervan, it’s time to purchase the necessary components of your campervan’s electrical system!
You will need:
- A Battery
- An Inverter
- Split Charger
- Solar Panels
- Fuse Box
- Battery Isolation Switch
- Fuses and Cables
- Solar Charge Controller
- USB Sockets
Installing the Electrical System
After buying all of the electrical system parts, it’s time to wire it all together!
For this process, it is worth hiring a professional electrician for safety reasons, and to ensure your system runs properly without damaging any equipment!
I also have a step by step guide with diagrams on how to wire the electricity in a campervan in The Van Conversion Guide!
Step Ten: Plumbing and Water System
Much like electricity, before installing your campervan’s water system you’ll want to think about how much water you’ll be using in your campervan.
A few important factors that will affect your water usage include:
- Will you be showering in the van?
- Will you want to take your van off-grid?
- How many people will be living in the van?
If you think you’ll be using a lot of water in the campervan, then opt for a larger water tank!
Another option for your water system, is to utilize a filtration system that can recycle the same water for showers.
The way this shower system works is that it pulls only from a 3.5 gallon water tank specifically used for the shower.
Once the water hits the drain, it begins cycling through 5 different filtration points before coming back down through the faucet!
This is a great alternative to hooking your shower up to your main water tank because it will prevent the shower from totally draining your water supply, and needing to carry either a huge water tank or frequently refill.
What Components are Needed for a Campervan Water System
For a campervan water system you will need:
- A freshwater tank
- A grey water tank
- A pump
- A hose for plumbing
- A filtration system (optional)
Installing the Plumbing and Water System
To have proper plumbing in your campervan, the hose will need to run from the tank, through the van and to your sink and showerhead.
The pump is what will make the water flow through the hose, and for hot water, you can also connect it through a water heater.
Then, to run the water, all you will need to do is flip a switch that is wired to the pump!
Step Eleven: Install Gas
The gas in your campervan will power your kitchen, and heat the van!
One of the most popular methods is to install a refillable LPG canister either underslung in the van, or in a sealed compartment inside the van itself.
The LPG is very cheap and easy to refill! To use the gas, it will need to be wired to your appliances with copper pipes.
For safety and insurance reasons, this process should be overseen by a professional engineer.
They can ensure your system works properly, and your campervan conversion will be safe!
Another heating option to heat your campervan is to install a Chinese Diesel Heater. These work very well and are quite simple to use.
Step Twelve: Decorations and Final Touches

This is one of the most fun parts of the convert a van to a camper process! Now that all of the hard work is complete, it’s time to really make this van a home.
Finishing touches and decor are what ultimately bring a DIY van conversion together and make it unique.
Some different ways to make your campervan unique include:
- Adding a beautiful tile backsplash to the kitchen
- Adding artwork into the van
- Using colorful fabrics and upholstery in the van
- Decorating the cab
This is certainly a step to have a little fun with, and for even more inspiration on how to decorate your van, check out these beautiful campervan interiors!
*Note: While decorating your van, be sure to securely latch all decorations to the van! That way, when you take your new home on the road, everything will stay where it is supposed to!
More inspiration: Best Campervan Conversion Ideas
How to Build a Campervan- Final Thoughts
There you have it, I hope that you’ve found this guide helpful on your journey to convert a campervan.
If you’ve read this guide and still find yourself wanting more information about how to make a camper van, then you should definitely absolutely in my ebook, The Van Conversion Guide.
It covers each step in far greater detail as well as offering exclusive videos for each complex part of the build.
Other guides you might like:
Build your own adventure
The guide anyone can use to convert a van into a camper! With over $350 worth of savings inside
Do you want to live vanlife at zero cost?
Nate Murphy knows how to buy vans, convert them quickly and efficiently - use them for years - and then sell them for a profit. This can make vanlife not just free, but profitable!
He has successfully done this for years and he teaches his friends and students to do exactly the same. It is not obvious, but anyone can do it if they have the knowledge!
Join Nate at his free online training (running today) and he will teach you exactly how he does this!


The Van Conversion Guide (14th Edition)
The guide anyone can use to convert a van into a camper! This best-selling guide, now in its 14th Edition, has been used by thousands of people to transform a van into a camper.
- 150+ page eBook
- Helps you convert any kind of van
- Diagrams for all the main systems
- FREE mini-course - 28 video tutorials